
A Simple Upgrade to Hide Our Clutter
- marteleliza
- Jan 13, 2021
- 4 min read
Updated: Mar 15, 2023
The truth is, almost everyone has clutter in their house. When selling a home, it is important to pre-pack items that are not used on a regular basis. This helps show the home in its best light, while allowing potential buyers to visualize themselves in the space. But even if you are not looking to place your home on the market - clearing away the clutter in your space can give you clarity and peace of mind. Which I highly recommend.
Like countless others, I spent a decent amount of time at home in 2020. With two little ones under the age of 6, I somehow managed to find time to learn how to reduce our home’s inventory from The Minimal Mom. The goal was to eliminate the things we had not been using, but there were still items that we do use and needed to keep. So finding a home for these items that was out of sight but accessible was key.
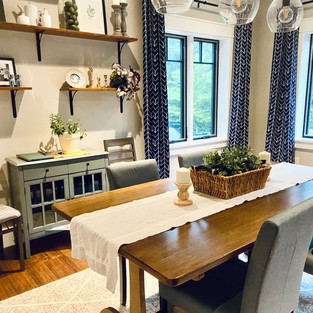
Our dining room space is a prime example of where some of our clutter lives. The table doubles as an arts & craft area for the kiddos and we have TONS of supplies. I have tried to store the abundance of supplies in a few different areas, especially since we needed to turn my craft room into my husband's work-from-home office. Craft time had sort of evolved into me towing around craft items while trying not to disturb the in-home business hours. So here I was, needing a new semi-permanent (and functional) solution.
Time to get that buffet table I had been dreaming about!


We had been using a small console table from our last house as a buffet. It was entirely too small for both the space and the arts and craft collection (even after reducing it down). I had been on the hunt to find a replacement prior to moving into our current home, so this was pretty exciting for me. I came across plenty of beautiful buffets, but everything I loved cost a bit more than I was willing to pay.

(A few examples from my Pinterest Board Our Home Inspiration and Wayfair)

My husband, Brian, is an experienced carpenter and cabinet maker who built our current home. When we see a big price tag our first thought is immediately; “Brian can build something even more custom and for a fraction of the price.” The problem with that is having the time, which means we often get stuck in limbo debating if the object is worth our investment or not. It is a good thing I enjoy a fun challenge!

Looking for something similar to the style I had come to love and, also, something super affordable lead me to Facebook Market. After weeks of searching, I found exactly what I was looking for! I was so thrilled when I came across the perfect buffet for our dining room.
It had plenty of character for just $80 and was the right size. Well, at least the bottom half was. The top piece was a tad too tall to fit under our air unit. We brainstormed and quickly came up with a plan for a future project where it could be used. Win, win! There was just one problem - It had clear glass doors that would show everything stored inside.
As much as I love styling shelves and cabinets, I was not keen on buying nice baskets that my kids would be pulling out from the shelves and probably, inevitably, end up destroying. Even with the mini window-dilemma I was sure I could find a way to keep the functionality of the storage cabinet, but also make it aesthetically pleasing. So off we went to pick up this dream buffet.

My solution - make the glass not see-through! Bam. Done. But the question was, "with what, exactly?” So I did my research (which I LOVE to do - if you couldn’t tell). That is when I came across Lauren Shaver from Bless’er House. She had used Antique Window Film on her bedroom closet doors as well as her pantry doors, and it looked amazing!
However, being almost another $50
toward the project, the price was a little too steep for me. The style could work, but Brian is not a big fan of things that look “old”, and so we compromised.
With that I took to Amazon and found exactly what we needed. A one way mirror film and for under 12 bucks! Now that I could work with. Having used privacy film on a bathroom window before I was “filmier” with the application process. ;-)


(My little helper was loving the spray bottle)
The application process was super simple; first make sure to clean the glass surface, let it dry and keep it lint free. Next, you will want to trim each piece to be about 1/4" larger than the final size. Remove the protective plastic then spray both the application side of the film and the glass with a bunch of water; you might want to keep a towel beneath your project to catch the extra drips! (I should mention here, I did have a small moment where I could not remember which side was the "front," in fact I am still unsure if I was right, but it did not make a huge difference). Now, place the film against the glass as best you can and work from the middle to push out any air bubbles. It is ok if at first you do not succeed; you can just peel the film off and add some water to try again. Once you get the air pockets out, trim off that 1/4" of excess film with a sharp utility knife. Be sure to wipe everything dry (water sitting on wood is never a good idea, and then, voila! Mission complete.
The whole project went so smoothly that I went ahead and did the same thing to the little console table (which is now at home in our entryway). I am very pleases with both of the pieces. You can check out this little time-lapse to see just how easy it is:
I truly believe keeping a tidy looking space should not break the bank. This was a simple project I was able to do on a couple different pieces throughout our home. There are always more than one way to solve a problem, and I hope this solution can inspire you to think outside the box, or in this case outside the cabinet. ;-)

Comments